This tutorial will cover deploying a stateless django stack to Amazon AWS. Our stack will consist of some version of Ubuntu (for this tutorial I’m using 12.04 LTS), nginx + gunicorn to serve the Django app, a Postgres Amazon RDS instance for the database, Amazon S3 for our static files and BitBucket as out private Git repository that the server updates from.
The code that does all the automation in this tutorial can be found here.
The Setup
Traditionally web hosts would have tight coupling between their servers, filesystems and databases. This makes for an easy setup but really reduces your options on terms of scalability. Having everything linked together would often mean that you needed to scale vertically; that is scale by buying bigger and better hardware.
These days with stuff out there such as Amazon Web Services (AWS) it is affordable to decouple all these components and scale them as needed. By decoupling our filesystem, database and servers into separate components we are able to create a stack where it is easy to scale out horizontally; that is by adding more components.
AWS is great, but out of the box it is pretty raw and there isn’t much in terms of getting a basic Django stack going. There are a few options with Amazon’s Elastic Beanstalk, however these are very limited in terms of configuration. The Elastic Beanstalk configuration for Django is something along the lines of a MySQL RDS server with Apache serving the Django stuff. This is OK, however a very common setup with Django is the nginx + gunicorn combo powering the site and a Postgres database behind it all.
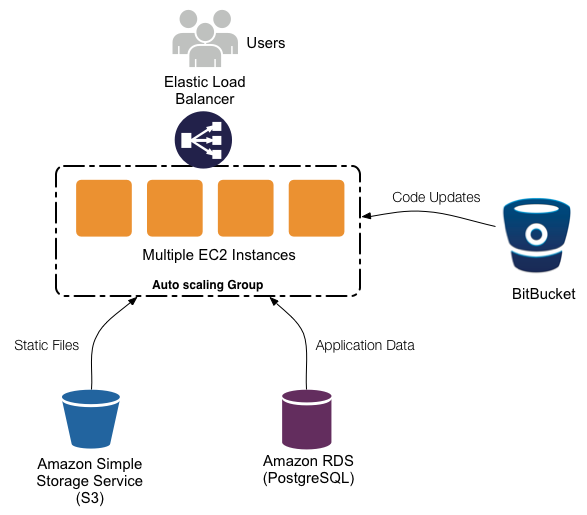
In this tutorial I will show you how to configure an AWS instance with nignx and gunicorn, with supervisor monitoring the processes to check that they are online. Our code will be stored on a private BitBucket repo (which is free), and we will be able to update our server with a single command. Our staticfiles will be served from Amazon S3 and our database will be an Amazon RDS instance running Postgres. This means that if at some later date you decided that you needed multiple instances running your app, you could just scale out and spawn more EC2 instances without having to worry about the shared static files or database stuff. But for the purposes of this tutorial we will keep it down to just one instance, as this then fits within Amazon’s free tier.

Prepping AWS
Firstly we need to take care of a few things on AWS before we can get started. The very first one is to generate a pair of AWS access keys and ssh keys if we don’t already have them. Follow the guides here and here to get these.
Secondly we need to create a security group for our AWS services so they can all talk to each other and the worldwide web. On the AWS console click on EC2 then on the lefthand side under Network and Security click on Security Groups. Now click on Create Security Group, and fill out the dialog with the name and description of your security group.

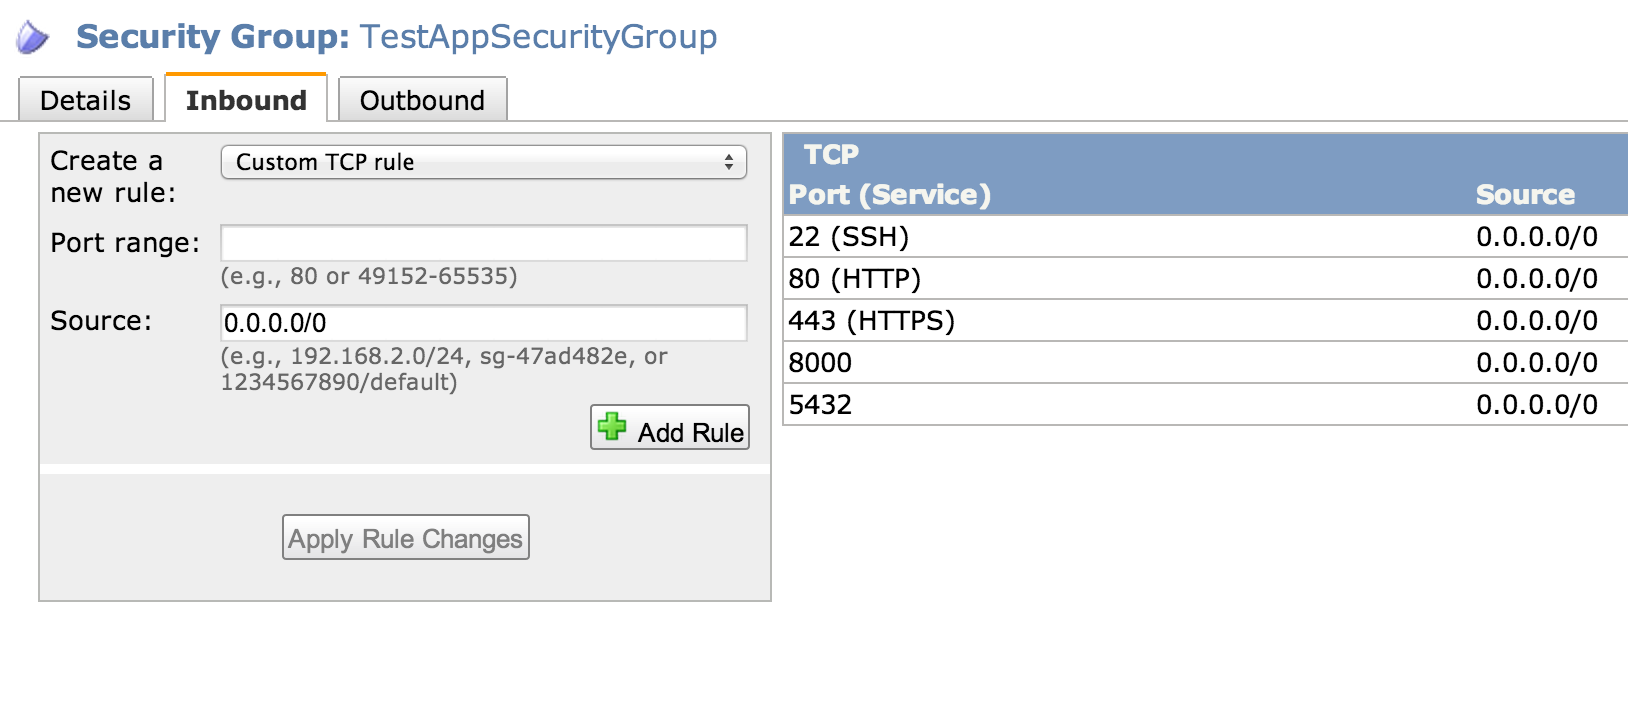
Once it’s created, go to the list of security groups and click on the one you created. Down the bottom of the screen click on the Inbound tab. In the Create a new rule dropdown box select SSH and click Add Rule. Do the same for HTTP and HTTPS. Then select Custom TCP rule and add port 5432 to the list – this is the port we connect to our Postgres server over. Also if you want to test the server using Django’s runserver command you can add port 8000 to the list, however this is optional. Finally click Apply Rule Change.
Setting up S3
Now we are able to setup an Amazon S3 bucket for our static files. In the AWS console go to the S3 page and click on Create Bucket. Name your bucket and choose a region for it to live in, and choose to setup logs if you want them later on. Note down what name you gave your S3 bucket, we’re going to need this later.
Setting up RDS
Now we need a database to power our Django app. In the AWS console go to the RDS page and click on Launch a DB Instance. Choose PostgreSQL as the engine by clicking Select next to it. If you want to take advantage of the high availability replication of RDS the choose Yes on the page asking if you want to use Multi-AZ, however for the purposes of keeping within the free tier we are going to select No for this step. Continue the process of adding database instance names, usernames and password taking care to note down all of these along the way.
Setting up Our Django Project
We need to be able to have separate settings for both our production and development code. To do this do the following
- Create a folder in the root directory of your Django project called requirements that has three pip requirements files in it:
- common.txt for all your common python dependancies between the server and local (add Django to this file)
- dev.txt for your local python dependancies
- prod.txt for your server python dependancies (add boto, django-storages and psycopg2 to this)
- Create a folder where the settings.py of your Django project is located called settings that has four Python files in it
- init.py
- common.py for all your common Django settings
- dev.py for your local Django settings
- prod.py for your server Django settings
- At the top of both dev.py and prod.py add the line
from <django_project_name>.settings.common import *
Change the
os.environ.setdefault("DJANGO_SETTINGS_MODULE", "<django_project_name>.settings")in both wsgi.py and manage.py to
os.environ.setdefault("DJANGO_SETTINGS_MODULE", "<django_project_name>.settings.prod")This means that the project with default to the production settings, however you can run it locally using
python manage.py runserver --settings=<django_project_name>.settings.devTo add the S3 bucket we created earlier to the project, add the following to settings/prod.py replacing <s3_staticfiles_bucket_name> with whatever you decided to call your bucket earlier.
INSTALLED_APPS += ('storages',)
AWS_STORAGE_BUCKET_NAME = "<s3_staticfiles_bucket_name>"
STATICFILES_STORAGE = 'storages.backends.s3boto.S3BotoStorage'
S3_URL = 'http://%s.s3.amazonaws.com/' % AWS_STORAGE_BUCKET_NAME
STATIC_URL = S3_URL
Finally we want to hook up our Amazon RDS instance to our code, so in settings/prod.py add the following information with the name, user and password filled in with the one’s you noted down when creating your RDS instance. The host URL can be found by going to the RDS section of the AWS console and clicking on your database to reveal it’s public DNS.
DATABASES = {
    'default': {
        'ENGINE': 'django.db.backends.postgresql_psycopg2',
        'NAME': 'mydbname',
        'USER' : 'mydbuser',
        'PASSWORD' : 'mydbpass',
        'HOST' : 'xxxx.xxxx.ap-southeast-2.rds.amazonaws.com',
        'PORT' : '5432',
    }
}
If you aren’t sure about how it should all look when you are done, check out this demo project that I’ve put up on GitHub.
Pushing the Project to BitBucket
We are going to use BitBucket’s free private Git hosting to host our code as this gives us a high quality location to store our code that our AWS servers can also access to update themselves. Firstly you will need to create a pair of SSH keys for BitBucket, which you can do by following these instructions. Keep that keyfile somewhere safe as we will need it soon.
You’ll need to make your Django project a git repo if you have haven’t already, on Mac OSX or Linux you can do this by opening the folder of your Django project on a terminal and typing
git initNow we want to tell the git repo to not store our fabric files when we add them to the project so in the same command prompt type
echo "./fabfile/" > .gitignore
git add .
git commit -m "Initial commit"
Now on the BitBucket site we need to create repository for our app. Do this by clicking on Create at the top of the page. Follow the steps to create a new repository, and to make life easier create it with the same name as our project. Now BitBucket will ask us if we have existing code to push up, which we do! Follow the instructions from BitBucket to add a remote repository, and push up the code to that repository.
Fabric
This is where the magic bits happen. Now our code is up on BitBucket and our AWS database and storage space are all online we can run a fabric file to do the rest. Fabric is an automation tool which allows you to run commands on remote servers.
Download this repo from GitHub and move the fabfile folder into your projects directory. In the command prompt type
pip install -r fabfile/requirements.txtThis will install fabric along with a few other things we need for our deployment. Now go into the file fabfile/project_conf.py and edit all the settings to match your own. There are quite a few things in here and they are all decently important, so take your time to make sure they are all corrent. Then from the project root type
fab spawn instanceThis takes a while, but all things going well will start an EC2 instance on AWS, setup nginx and gunicorn on it, pull your code from BitBucket, install your Python packages from the requirements files we made earlier, setup supervisor to manage the server, collect your static files and send them to S3 and finally sync your database tables with RDS before starting the server process and giving you its public URL.
Be sure to take this public URL and add it to the EC2_INSTANCE list at the bottom of fabfile/project_conf.py, so that any future calls we make to the fab file know which server to execute stuff on.
Maintenance
If all went well then now all you have to do when you want to update your server is push the latest version of your code to BitBucket then type
fab deployinto your command prompt at the root of your Django project. This will tell the server to pull the latest version of your code from BitBucket then reload the servers. If you added Python packages you will also need to
fab update_packagespossibly followed by a
fab reload_gunicornto get the changes to show up.
A full list of the commands is available in the readme for the fabric file on GitHub. Happy deploying!
