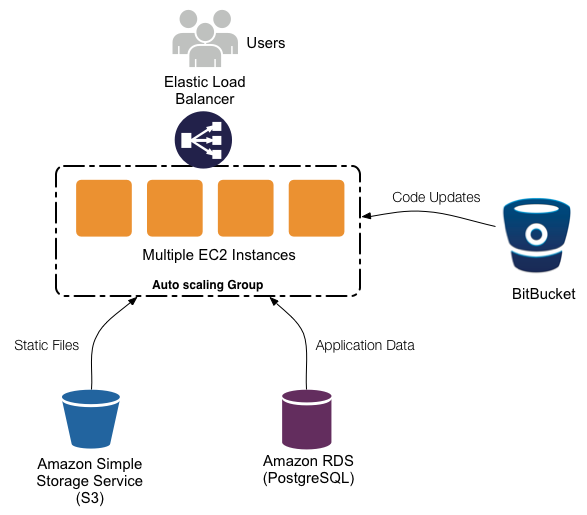
This tutorial will cover deploying a stateless django stack to Amazon AWS. Our stack will consist of some version of Ubuntu (for this tutorial I’m using 12.04 LTS), nginx + gunicorn to serve the Django app, a Postgres Amazon RDS instance for the database, Amazon S3 for our static files and BitBucket as out private Git repository that the server updates from.
The code that does all the automation in this tutorial can be found here.
The Setup
Traditionally web hosts would have tight coupling between their servers, filesystems and databases. This makes for an easy setup but really reduces your options on terms of scalability. Having everything linked together would often mean that you needed to scale vertically; that is scale by buying bigger and better hardware.
These days with stuff out there such as Amazon Web Services (AWS) it is affordable to decouple all these components and scale them as needed. By decoupling our filesystem, database and servers into separate components we are able to create a stack where it is easy to scale out horizontally; that is by adding more components.
AWS is great, but out of the box it is pretty raw and there isn’t much in terms of getting a basic Django stack going. There are a few options with Amazon’s Elastic Beanstalk, however these are very limited in terms of configuration. The Elastic Beanstalk configuration for Django is something along the lines of a MySQL RDS server with Apache serving the Django stuff. This is OK, however a very common setup with Django is the nginx + gunicorn combo powering the site and a Postgres database behind it all.
In this tutorial I will show you how to configure an AWS instance with nignx and gunicorn, with supervisor monitoring the processes to check that they are online. Our code will be stored on a private BitBucket repo (which is free), and we will be able to update our server with a single command. Our staticfiles will be served from Amazon S3 and our database will be an Amazon RDS instance running Postgres. This means that if at some later date you decided that you needed multiple instances running your app, you could just scale out and spawn more EC2 instances without having to worry about the shared static files or database stuff. But for the purposes of this tutorial we will keep it down to just one instance, as this then fits within Amazon’s free tier.

Prepping AWS
Firstly we need to take care of a few things on AWS before we can get started. The very first one is to generate a pair of AWS access keys and ssh keys if we don’t already have them. Follow the guides here and here to get these.
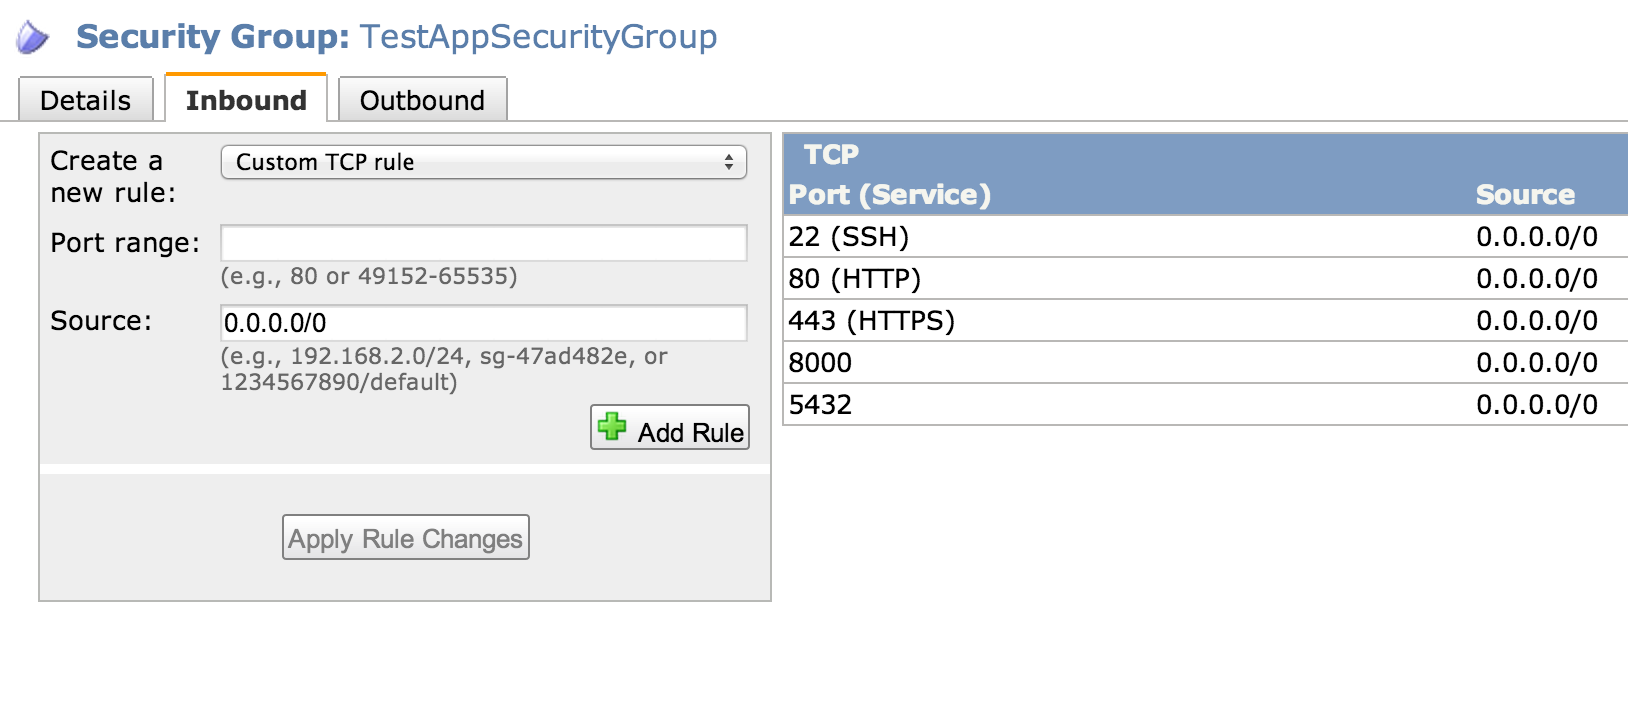
Secondly we need to create a security group for our AWS services so they can all talk to each other and the worldwide web. On the AWS console click on EC2 then on the lefthand side under Network and Security click on Security Groups. Now click on Create Security Group, and fill out the dialog with the name and description of your security group.

Once it’s created, go to the list of security groups and click on the one you created. Down the bottom of the screen click on the Inbound tab. In the Create a new rule dropdown box select SSH and click Add Rule. Do the same for HTTP and HTTPS. Then select Custom TCP rule and add port 5432 to the list – this is the port we connect to our Postgres server over. Also if you want to test the server using Django’s runserver command you can add port 8000 to the list, however this is optional. Finally click Apply Rule Change.
Setting up S3
Now we are able to setup an Amazon S3 bucket for our static files. In the AWS console go to the S3 page and click on Create Bucket. Name your bucket and choose a region for it to live in, and choose to setup logs if you want them later on. Note down what name you gave your S3 bucket, we’re going to need this later.
Setting up RDS
Now we need a database to power our Django app. In the AWS console go to the RDS page and click on Launch a DB Instance. Choose PostgreSQL as the engine by clicking Select next to it. If you want to take advantage of the high availability replication of RDS the choose Yes on the page asking if you want to use Multi-AZ, however for the purposes of keeping within the free tier we are going to select No for this step. Continue the process of adding database instance names, usernames and password taking care to note down all of these along the way.
Setting up Our Django Project
We need to be able to have separate settings for both our production and development code. To do this do the following
- Create a folder in the root directory of your Django project called requirements that has three pip requirements files in it:
- common.txt for all your common python dependancies between the server and local (add Django to this file)
- dev.txt for your local python dependancies
- prod.txt for your server python dependancies (add boto, django-storages and psycopg2 to this)
- Create a folder where the settings.py of your Django project is located called settings that has four Python files in it
- init.py
- common.py for all your common Django settings
- dev.py for your local Django settings
- prod.py for your server Django settings
- At the top of both dev.py and prod.py add the line
from <django_project_name>.settings.common import *
Change the
os.environ.setdefault("DJANGO_SETTINGS_MODULE", "<django_project_name>.settings")in both wsgi.py and manage.py to
os.environ.setdefault("DJANGO_SETTINGS_MODULE", "<django_project_name>.settings.prod")This means that the project with default to the production settings, however you can run it locally using
python manage.py runserver --settings=<django_project_name>.settings.devTo add the S3 bucket we created earlier to the project, add the following to settings/prod.py replacing <s3_staticfiles_bucket_name> with whatever you decided to call your bucket earlier.
INSTALLED_APPS += ('storages',)
AWS_STORAGE_BUCKET_NAME = "<s3_staticfiles_bucket_name>"
STATICFILES_STORAGE = 'storages.backends.s3boto.S3BotoStorage'
S3_URL = 'http://%s.s3.amazonaws.com/' % AWS_STORAGE_BUCKET_NAME
STATIC_URL = S3_URL
Finally we want to hook up our Amazon RDS instance to our code, so in settings/prod.py add the following information with the name, user and password filled in with the one’s you noted down when creating your RDS instance. The host URL can be found by going to the RDS section of the AWS console and clicking on your database to reveal it’s public DNS.
DATABASES = {
    'default': {
        'ENGINE': 'django.db.backends.postgresql_psycopg2',
        'NAME': 'mydbname',
        'USER' : 'mydbuser',
        'PASSWORD' : 'mydbpass',
        'HOST' : 'xxxx.xxxx.ap-southeast-2.rds.amazonaws.com',
        'PORT' : '5432',
    }
}
If you aren’t sure about how it should all look when you are done, check out this demo project that I’ve put up on GitHub.
Pushing the Project to BitBucket
We are going to use BitBucket’s free private Git hosting to host our code as this gives us a high quality location to store our code that our AWS servers can also access to update themselves. Firstly you will need to create a pair of SSH keys for BitBucket, which you can do by following these instructions. Keep that keyfile somewhere safe as we will need it soon.
You’ll need to make your Django project a git repo if you have haven’t already, on Mac OSX or Linux you can do this by opening the folder of your Django project on a terminal and typing
git initNow we want to tell the git repo to not store our fabric files when we add them to the project so in the same command prompt type
echo "./fabfile/" > .gitignore
git add .
git commit -m "Initial commit"
Now on the BitBucket site we need to create repository for our app. Do this by clicking on Create at the top of the page. Follow the steps to create a new repository, and to make life easier create it with the same name as our project. Now BitBucket will ask us if we have existing code to push up, which we do! Follow the instructions from BitBucket to add a remote repository, and push up the code to that repository.
Fabric
This is where the magic bits happen. Now our code is up on BitBucket and our AWS database and storage space are all online we can run a fabric file to do the rest. Fabric is an automation tool which allows you to run commands on remote servers.
Download this repo from GitHub and move the fabfile folder into your projects directory. In the command prompt type
pip install -r fabfile/requirements.txtThis will install fabric along with a few other things we need for our deployment. Now go into the file fabfile/project_conf.py and edit all the settings to match your own. There are quite a few things in here and they are all decently important, so take your time to make sure they are all corrent. Then from the project root type
fab spawn instanceThis takes a while, but all things going well will start an EC2 instance on AWS, setup nginx and gunicorn on it, pull your code from BitBucket, install your Python packages from the requirements files we made earlier, setup supervisor to manage the server, collect your static files and send them to S3 and finally sync your database tables with RDS before starting the server process and giving you its public URL.
Be sure to take this public URL and add it to the EC2_INSTANCE list at the bottom of fabfile/project_conf.py, so that any future calls we make to the fab file know which server to execute stuff on.
Maintenance
If all went well then now all you have to do when you want to update your server is push the latest version of your code to BitBucket then type
fab deployinto your command prompt at the root of your Django project. This will tell the server to pull the latest version of your code from BitBucket then reload the servers. If you added Python packages you will also need to
fab update_packagespossibly followed by a
fab reload_gunicornto get the changes to show up.
A full list of the commands is available in the readme for the fabric file on GitHub. Happy deploying!

Hello there! Great post and great repo! I’m just wondering if you could help me with one problem. I’m getting the following erros:
~/workspace/opti2.0/project$ fab spawn instance
[] Executing task ‘spawn’
Started…
Creating instance
Traceback (most recent call last):
File “/usr/local/lib/python2.7/dist-packages/fabric/main.py”, line 743, in main
*args, **kwargs
File “/usr/local/lib/python2.7/dist-packages/fabric/tasks.py”, line 424, in execute
results[”] = task.run(*args, **new_kwargs)
File “/usr/local/lib/python2.7/dist-packages/fabric/tasks.py”, line 174, in run
return self.wrapped(*args, **kwargs)
File “/home/matheusjardimb/workspace/opti2.0/project/fabfile/django_fabric_aws.py”, line 76, in instance
env.host_string = _create_ec2_instance()
File “/home/matheusjardimb/workspace/opti2.0/project/fabfile/django_fabric_aws.py”, line 192, in _create_ec2_instance
reservation = image[0].run(1, 1, ec2_keypair, ec2_secgroups, instance_type=ec2_instancetype)
File “/usr/local/lib/python2.7/dist-packages/boto/ec2/image.py”, line 329, in run
tenancy=tenancy, dry_run=dry_run)
File “/usr/local/lib/python2.7/dist-packages/boto/ec2/connection.py”, line 974, in run_instances
verb=’POST’)
File “/usr/local/lib/python2.7/dist-packages/boto/connection.py”, line 1204, in get_object
raise self.ResponseError(response.status, response.reason, body)
boto.exception.EC2ResponseError: EC2ResponseError: 400 Bad Request
InvalidGroup.NotFoundThe security group ‘XXX’ does not exist in default VPC ‘vpc-XXX’…I believe the post may be slightly outdated, or I have misconfigured something. Do you have any tip on this? Thanks a lot!
You may ignore my comment. It was my mistake 😀
No worries! I am planning on writing an update version of this using Docker which will make the deploy a lot let involved and hopefully will help get rid of any weird errors
That’s awesome! I just can’t wait to see this 😀
Hi. I’m running into the same problem but don’t see what I’m doing wrong. My VPC is e1b9e684 but the default VPC used by fab is ca8354af. How does one change the VPC used by fab? I couldn’t see that anywhere in the source code or configuration.
In any case, thank you very much for the post, Ashok. It has been incredibly helpful!
$ fab spawn instance
[] Executing task ‘spawn’
Started…
Creating instance
Traceback (most recent call last):
File “/Users/admin/.virtualenvs/aws-test/lib/python2.7/site-packages/fabric/main.py”, line 717, in main
*args, **kwargs
File “/Users/admin/.virtualenvs/aws-test/lib/python2.7/site-packages/fabric/tasks.py”, line 332, in execute
results[”] = task.run(*args, **new_kwargs)
File “/Users/admin/.virtualenvs/aws-test/lib/python2.7/site-packages/fabric/tasks.py”, line 112, in run
return self.wrapped(*args, **kwargs)
File “/Users/admin/code/aws/aws_test/fabfile/django_fabric_aws.py”, line 74, in instance
env.host_string = _create_ec2_instance()
File “/Users/admin/code/aws/aws_test/fabfile/django_fabric_aws.py”, line 182, in _create_ec2_instance
instance_type=ec2_instancetype)
File “/Users/admin/.virtualenvs/aws-test/lib/python2.7/site-packages/boto/ec2/image.py”, line 255, in run
additional_info=additional_info)
File “/Users/admin/.virtualenvs/aws-test/lib/python2.7/site-packages/boto/ec2/connection.py”, line 707, in run_instances
return self.get_object(‘RunInstances’, params, Reservation, verb=’POST’)
File “/Users/admin/.virtualenvs/aws-test/lib/python2.7/site-packages/boto/connection.py”, line 1000, in get_object
raise self.ResponseError(response.status, response.reason, body)
boto.exception.EC2ResponseError: EC2ResponseError: 400 Bad Request
InvalidGroup.NotFoundThe security group ‘sg-fe3a1d9a’ does not exist in default VPC ‘vpc-ca8354af’d3898ecb-9edf-4783-94b7-3e20a6527dfaSorry I can’t be of much help on this issue. Seems to be something pretty specific to your security setup on AWS.
Thanks for the reply, I found a workaround.
How do you access the app? I’m thinking it’s something along the lines of just copying and pasting the public ip from the amazon ec2 instance. However, I get the nginx 404 error. Does this mean that nginx is configured incorrectly? How do I go about solving this?
That is probably a issue with nginx not being configured properly, best bet would be to post a question on StackOverflow along with the configuration file and see what they say there.
This is an amazing tutorial, and it has gotten me the farthest in my quest to deploy my django app onto aws. One quick question though. When I run ‘fab spawn instance’, I get
Traceback (most recent call last):
File “/Users/moosh/rec/lib/python2.7/site-packages/fabric/main.py”, line 637, in main
docstring, callables, default = load_fabfile(fabfile)
File “/Users/moosh/rec/lib/python2.7/site-packages/fabric/main.py”, line 164, in load_fabfile
imported = importer(os.path.splitext(fabfile)[0])
File “/Users/moosh/clients/django_app/fabfile/__init__.py”, line 1, in
from django_fabric_aws import *
File “/Users/moosh/clients/django_app/fabfile/django_fabric_aws.py”, line 44, in
from project_conf import *
File “/Users/moosh/clients/django_app/fabfile/project_conf.py”, line 42, in
fabconf[‘PROJECT_PATH’] = “%s/%s” % (fabconf[‘foo’], fabconf[‘bar’])
KeyError: ‘foo’
My project’s name is ‘ bar’ and it is in directory ‘foo’. I’m not sure where the problem lies, because the APPS_DIR is indeed ‘foo’. Thank you very much!
Key error indicates that something isn’t quite right with the config file. Perhaps there is a spelling mistake somewhere?
Just wanted to say thanks, tried a few other guides which weren’t quite working for me but was able to get everything up and running with yours.
Only comment is where you have
fab update
I think it should be
fab update_requirements
Whoops! Thanks for spotting that, fixed it now.
Great post, thank you! I decided to take the plunge and try it with Python 3. Unfortunately fabric doesn’t work with python 3 yet, but I found one suggestion to make a separate Python 2 virtualenv just to run fabric – http://stackoverflow.com/questions/18736274/python-3-support-for-fabric#answer-24297934 . I’ll let you know if I can get it working. Do you have any suggestions?
I don’t have a lot of experience with Python 3 but all of the lines in tasks.py are just commands run over SSH so maybe there is another package out there that will allow you to run them? Good luck, interested to hear how it goes
It looks like supervisor isn’t yet compatible with Python 3 either, so I reverted to Python2.7. Thanks again for this post – I have a very simple Django 1.7 app (almost) working on EC2 now. My sticking point is that the admin page’s links to its static files – which are nicely set up in my S3 bucket – are using https. So they are not found. (I am using just the settings you describe above, I haven’t done this on purpose!) Do you know how to tell Django boto to use http? Thanks!
I’ve worked out my problem with SSL and S3 – I had a “.” in my bucket name. Apparently this causes SSL certificate problems.
That’s a tricky one haha good to know!
This is a brilliant tutorial and helped me learn a lot about deploying django apps on AWS. One quick question though. fab spawn instance created the aws instance with nginx and gunicorn installed but when I tried accessing the site on that machine I got a 400 Bad Request. I checked the nginx-error log but that was empty and the nginx-access log showed that it had received the requests. The supervisor log had the following:
2015-01-31 21:26:20 +0000] [15823] [INFO] Starting gunicorn 19.2.0
[2015-01-31 21:26:20 +0000] [15823] [INFO] Listening at: http://127.0.0.1:8002 (15823)
[2015-01-31 21:26:20 +0000] [15823] [INFO] Using worker: sync
[2015-01-31 21:26:20 +0000] [15832] [INFO] Booting worker with pid: 15832
[2015-01-31 21:26:20 +0000] [15833] [INFO] Booting worker with pid: 15833
[2015-01-31 21:26:20 +0000] [15834] [INFO] Booting worker with pid: 15834
[2015-01-31 21:26:20 +0000] [15835] [INFO] Booting worker with pid: 15835
[2015-01-31 21:26:20 +0000] [15836] [INFO] Booting worker with pid: 15836
[2015-01-31 21:26:31 +0000] [15837] [INFO] Starting gunicorn 19.2.0
[2015-01-31 21:26:31 +0000] [15837] [ERROR] Connection in use: (‘127.0.0.1’, 8002)
[2015-01-31 21:26:31 +0000] [15837] [ERROR] Retrying in 1 second.
[2015-01-31 21:26:32 +0000] [15837] [ERROR] Connection in use: (‘127.0.0.1’, 8002)
[2015-01-31 21:26:32 +0000] [15837] [ERROR] Retrying in 1 second.
[2015-01-31 21:26:33 +0000] [15837] [ERROR] Connection in use: (‘127.0.0.1’, 8002)
[2015-01-31 21:26:33 +0000] [15837] [ERROR] Retrying in 1 second.
[2015-01-31 21:26:34 +0000] [15837] [ERROR] Connection in use: (‘127.0.0.1’, 8002)
[2015-01-31 21:26:34 +0000] [15837] [ERROR] Retrying in 1 second.
[2015-01-31 21:26:35 +0000] [15837] [ERROR] Connection in use: (‘127.0.0.1’, 8002)
[2015-01-31 21:26:35 +0000] [15837] [ERROR] Retrying in 1 second.
[2015-01-31 21:26:36 +0000] [15837] [ERROR] Can’t connect to (‘127.0.0.1’, 8002)
[2015-01-31 21:26:37 +0000] [15846] [INFO] Starting gunicorn 19.2.0
[2015-01-31 21:26:37 +0000] [15846] [INFO] Listening at: http://127.0.0.1:8002 (15846)
[2015-01-31 21:26:37 +0000] [15846] [INFO] Using worker: sync
[2015-01-31 21:26:37 +0000] [15855] [INFO] Booting worker with pid: 15855
[2015-01-31 21:26:37 +0000] [15856] [INFO] Booting worker with pid: 15856
[2015-01-31 21:26:37 +0000] [15857] [INFO] Booting worker with pid: 15857
[2015-01-31 21:26:38 +0000] [15858] [INFO] Booting worker with pid: 15858
[2015-01-31 21:26:38 +0000] [15859] [INFO] Booting worker with pid: 15859
This is the first time I am deploying a django app on nginx and I can’t figure out what the problem might be. Could you please help me debug this error?
Thanks in advance!!
I checked a few answers on AWS and tried all combinations for ALLOWED_HOSTS in settings/prod.py. I tried leaving it as [ ] and then [‘*’] and also ‘*’ I am still not able to access the site.
I have left fabconf[“DOMAINS”] = “” Is that causing a problem?
It might have something to do with using a newer version of Gunicorn. Try setting adding a version number to the line in tasks.py which installs gunicord, for example
{“action”:”virtualenv”, “params”:”pip install gunicorn==18.0″, “message”:”Installing gunicorn”}
@Varun and Ashok: I am facing the same issue. Perhaps due to lack of complete understanding of the nginx+gunicorn configuration.
1. I am not sure what value I should assign to fabconf[“DOMAINS”]
2. Which URI should I use to access the site from my local machine browser once `fab spawn instance` and `fab deploy` are working?
3. Where do I configure my own domain name “mydomainname.com” which I want the users to access?
Thanks for putting up this great guide.
You’ll need to update the DNS records on your name server to point to the EC2 instance you just setup. I usually use CloudFlare for that, as it lets you update your DNS records without having to wait for the changes to propagate, plus a few nice bonuses (like free https!)
Here’s something that tripped me up when putting the settings into a subdirectory: Don’t forget to update the “BASE_DIR” line! The default is to use the setting file’s parent directory (which it achieves by calling os.path.dirname twice; once to get the directory, and once to get its directory). So change it to: BASE_DIR = os.path.dirname(os.path.dirname(os.path.dirname(__file__)))
Hi, This is very nice and very helpful tutorial. I have one problem. in project_conf.py fabconf[‘SERVER_USERNAME’] – what is this variable?
When I spawn an instance, it asks for login password with the ‘SERVER_USERNAME’. I tried with my amazon account login with no success. Please let me know these variables.
Thanks,
Subash
If you’ve used an ubuntu instance it should be ‘ubuntu’
Hi there, just an fyi, you have a period in the end of this line and it might mess up some folks:
os.environ.setdefault(“DJANGO_SETTINGS_MODULE”, “.settings.prod”).
Nice catch! Thanks, fixed that now
Hi, thank you for the great article!!!
I do have a question regarding the use of AWS Elastic Load Balancer + Auto Scaling Group together with this setup.
So I imagine that I can replicate the spawning process with a Launch Configuration (copy the task.py’s commands for spawning). So if it really needs to spawn new EC2 instance (based on Cloud Watch metrics), it can replicate the ‘fab spawn instance’ ? Do you think this will work ?
So eventually, if I wanna deploy code I will need to add these automatedly spawned instances’ public dns in ?
That’s a little out of the scope of what this code can do for you right now, but with some tweaking it might work out. Probably best to look at some more dedicated tools for that like Elastic Beanstalk or Ansible etc
Can you update this tutorial for Python 3? Almost all the requirements in the fabfile>requirements.txt file are not installed when running with python 3.
Sorry I don’t have time to keep this tutorial up to date, however you are welcome to make a pull request on the GitHub repo!
Just FYI, in the prod settings module, you’re forgetting an open curly bracket to begin the object literal for the ‘default’ key of the DATABASES object. i.e., instead of
“””
DATABASES = {
‘default’:
“””
it should read:
“””
DATABASES = {
‘default’: {
“””
Thanks for the helpful article!
Thanks, fixed now
Across two different machines, I was consistently getting “connection refused” errors after attempting to initially connect after spawning an instance. I think it would be helpful to mention that you can prevent this by increasing the sleep time at line 76 of django_fabric_aws.py to something like 60 seconds.
Updated the repos on GitHub to have a 60 second timeout, thanks for the feedback!
When I try to access my page, I get a 404 error. I think it’s because the RDS database isn’t connecting properly. I have the endpoint as the host in my Django settings, but should I be doing something different?
Correction, I get an nginx/1.4.6 (Ubuntu) 404 Error. Is the nginx configuration out of date?
Like I’ve said in the other comments, I don’t activly use this script in my own day to day work anymore so I’m not too sure how out of date it is. But if you do find a bug fix, please make a pull request on the GitHub page!
Thanks a lot for the tutorial! 🙂
Hi Ashok, I know you are not actively maintaining this repo any longer but can you give some pointers for how to scale horizontally(add more EC2 instances) behind a load balancer i.e. how to setup the 2nd instance? I have a project with this setup which is serving ~2000 users daily using a large EC2 instance and would have to scale soon to multiple instances.
Hi @Ankit, have you considered trying out AWS elastic beanstalk for managing your instances? If you wrap your app up using docker this is very easy to use and has the added bonus of making your app super portable. I can write a tutorial on how to do that if you think it will help?
Hi Ashok, thanks for the response. Sure, that would be great but I am afraid that using EBS would limit the flexibility as you mentioned at the start of the post `There are a few options with Amazon’s Elastic Beanstalk, however these are very limited in terms of configuration. `
I was thinking of horizontal scaling behind Load Balancer(as in your 2nd architecture image) along these lines (not really sure if this is the correct way to approach this) –
1. Configure Load Balancer and make it working with the current single instance setup(not sure what changes exactly would need to be done on the nginx-gunicorn side)
2. Spawn another instance
3. Change the fabric tasks and project_conf.py such that fab deploy and other fab commands work across all the instances behind the load balancer.
I am a newbie who is now all of a sudden faced with scaling challenges for my startup. Not even sure if the steps I listed make complete sense or not. What do you think?
That would be awesome dude. thank you a lot for this tuto bytheway
Initially the Elastic Beanstalk offering looked pretty limited but the addition of Docker support has made it a very useful tool. Basically you wrap up your Django app into a docker container, and then push this to elastic beanstalk. Elastic beanstalk will then automatically monitor the load and scale up extra instances as you’ve specified. You only pay for the resources you use, so it doesn’t cost any more than if you setup the load balancer yourself, it’s just a lot easier to do.
Sure, I will check out the documentation of EBS + Docker. If you can get a tutorial out in a week or two, that would be great!
Fabric not compatible with python 3.xx…. any workaround ???????…… Great tutorial
Hi Jerin. Not sure if there will be a work around, perhaps Fabric will release a Python 3 compatible version. I don’t actively maintain this script anymore, however if you do keep using it and are able to get it working with Python 3 then please let me know and make a pull request to the git repo to keep it up to date.
Hi Ashok,
Thanks a lot for this superb tutorial. It helped me a lot till a point. But now I am stuck while installing the requirements fro fabfile. When I tried ‘pip install -r fabfile/requirements.txt’ in my terminal, it throws an error saying:
Collecting Fabric==1.4.3 (from -r fabfile/requirements.txt (line 1))
Using cached Fabric-1.4.3.tar.gz
Complete output from command python setup.py egg_info:
Traceback (most recent call last):
File “”, line 20, in
File “/tmp/pip-build-zfq4ge3l/Fabric/setup.py”, line 7, in
from fabric.version import get_version
File “/tmp/pip-build-zfq4ge3l/Fabric/fabric/version.py”, line 104
print get_version(‘all’)
^
SyntaxError: invalid syntax
—————————————-
Command “python setup.py egg_info” failed with error code 1 in /tmp/pip-build-zfq4ge3l/Fabric
Could you please guide me how to resolve this issue and move forward for the deployment.
Are you using Python 3? The syntax `print` has changed in Python 3 as far as I know. Unfortunately this seems to only be working with Python 2 and I don’t currently maintain this script so won’t be able to help sorry, best of luck!
Probably not a good idea to store database logins in settings.py
You can use OS env variables for and modify settings.py :
if ‘RDS_HOSTNAME’ in os.environ:
DATABASES = {
‘default’: {
‘ENGINE’: ‘django.db.backends.postgresql_psycopg2’,
‘NAME’: os.environ[‘RDS_DB_NAME’],
‘USER’: os.environ[‘RDS_USERNAME’],
‘PASSWORD’: os.environ[‘RDS_PASSWORD’],
‘HOST’: os.environ[‘RDS_HOSTNAME’],
‘PORT’: ”,
}
}
Good tip! Thanks
I just had an error when the comment “killall supervisord” run and supervisord wasn’t running.
Wouldn’t it be better to change it to “killall supervisord -q” so deployment wont break?
Yeah I guess that would be better. Feel free to make a PR to the GitHub repo.
@ashokfernandez Thanks for this nice article. I was wondering how you can do continuous deployment/delivery with autoscale ? If you have 10 running instances with autoscale and you want to update the app version, release the new code how you sync all the instances with new code ?
Thanks!
I would look at using something like CircleCI with ElasticBeanstalk for that, it’s a lot easier than trying to configure it yourself.
After creating the instance and rebooting, it’s asking me for a password for the user ubuntu. I tried ubuntu as the password, but it’s not working. Need some help here. Very nice write up anyways. 🙂
Sounds like you might be trying to SSH into the box without using your certificate. Normally if you’ve SSH’d with the certificate you don’t need a password. Not sure, hope that helps!
I’m having some trouble getting this to run on AWS China, I’m in some contact with their support about what is or isn’t possible (auth is failing where it shouldn’t) but there are a couple other things that would need addressing as well – s3 endpoint URLS use ‘s3-website.cn-north-1.amazonaws.com.cn’ instead of ‘s3-website-us-east-1.amazonaws.com’ for example.
Let me know if you’re interested in helping me extend it!
Sound great, feel free to link to this article if you write up on how to get it going in China. And as always, feel free to make a pull request to the GitHub repo to keep it up to date!
Hi, thanks for this great tutorial! The graph and the tips make it super clear.
I’m following this tutorial to the last step, and there is a small issue here:
When I try to run “fab spawn instance”, it gives me this:”
Traceback (most recent call last):
File “/Library/Python/2.7/site-packages/fabric/main.py”, line 745, in main
*args, **kwargs
File “/Library/Python/2.7/site-packages/fabric/tasks.py”, line 427, in execute
results[”] = task.run(*args, **new_kwargs)
File “/Library/Python/2.7/site-packages/fabric/tasks.py”, line 174, in run
return self.wrapped(*args, **kwargs)
File “/Users/Libby/test_tuning/fabfile/django_fabric_aws.py”, line 74, in instance
env.host_string = _create_ec2_instance()
File “/Users/Libby/test_tuning/fabfile/django_fabric_aws.py”, line 178, in _create_ec2_instance
image = conn.get_all_images(ec2_amis)
AttributeError: ‘NoneType’ object has no attribute ‘get_all_images’
”
So it seems that the ” conn = boto.ec2.connect_to_region(ec2_region, aws_access_key_id=fabconf[‘AWS_ACCESS_KEY’], aws_secret_access_key=fabconf[‘AWS_SECRET_KEY’])
” return a “none” for connection.
Why does it happen? Do you have any idea? And is it because I’m using different versions of boto and fabric?
Hi! I just ran into this, when I do “fab spawn instance”, I get:”
File “/Users/Libby/test_tuning/fabfile/django_fabric_aws.py”, line 74, in instance
env.host_string = _create_ec2_instance()
File “/Users/Libby/test_tuning/fabfile/django_fabric_aws.py”, line 178, in _create_ec2_instance
image = conn.get_all_images(ec2_amis)
AttributeError: ‘NoneType’ object has no attribute ‘get_all_images'”
How can I solve this?
Thanks again, for this great tutorial!
Sorry I don’t have time to debug your code for you.
Hi! Do you mean that the “django_fabric_aws.py” is actually right, it’s just my own code has some problems?
You know, you telling me that is helpful 🙂 Cuz I thought there was something wrong with the django_fabric_aws.py I’m gonna debug it . Thanks again 🙂
I asked only because I was debugging django_fabric_aws.py for , like , 3 hours. And I didn’t find answer on Google and on Stackoverflow. So you are like, the person who should know it. Sorry if it bothers you.
Does not work for S3 in Ireland, Frankfurt or Mumbai due to roll out of AWS sigv4, unsupported by boto still.
hello there. great tutorial! However before I start, i want to confirm if my project is suitable for this deployment.
I am trying to host a version of this instance: https://github.com/rapidpro/rapidpro on AWS. Is it possible? Thanks
I have no idea, give it a go and find out!
Hiya, any idea what this error could mean? Seems like somethings up with the pem file maybe because its asking for a password..?
Waiting 60 seconds for server to boot…
[ec2-52-56-48-186.eu-west-2.compute.amazonaws.com] run: whoami
No handlers could be found for logger “ssh.transport”
[ec2-52-56-48-186.eu-west-2.compute.amazonaws.com] Login password for ‘ubuntu’:
Oops, spoke too soon. My issue was some package versions were too old (Fabric, Cryptography, and PIP itself). Updated all of them and its working 🙂
Guys, I have put up a working version of this project with Python3 support.
https://github.com/ankit-maverick/Django-Fabric-AWS-Py3
If you come across any issue, feel free to raise it on Github.
Awesome! Thank’s for keeping it updated for people who still land on this page
In fabfile/requirements.txt “wsgiref” is not compatible with python3, please help
Sorry I don’t maintain this project anymore, good luck!
Very useful post.
Alternatively you could also try out AWS develop/DevOps tools like AWSPipeline, AWSDeploy, that could work well wit Git repositories and probably simpler & easier to maintain too..
These tools we’re out when I wrote this, I would definitely recommend them now over doing it yourself!
This is great tutorial – did you ever end up writing a follow-up using Docker and EB?…I’d be keen to see it if you did. Thanks!
I didn’t, but the AWS tutorials on setting up EB are pretty easy to follow!